


Skin grafting
There is an increasing trend to use skin transplants when treating chronic wounds to shorten the time to healing significantly. Consider, for example, a venous ulcer on a leg with an area of about 6cm2. It is quite normal for venous ulcers to have this size, and the average natural healing time (under optimal conditions) will be around 3-6 months, possibly even longer. If we apply a skin graft, it may heal within 3-4 weeks. Skin grafting is a very cost-efficient method and can often be performed in rural clinics. One of the disadvantages is that we create a new wound at the donor site, and sometimes this may heal slowly. However, if the donor site is treated correctly, there are usually few complications. There are also less invasive methods for harvesting skin grafts, like pinch grafts and blister grafts.
When using skin grafts to achieve healing in a chronic wound, we have to use a graft from the same patient (autologous skin graft). We cannot use a graft from another person - the wound bed will reject this.
To ensure that the skin graft will take the wound bed must have adequate blood circulation and healthy-looking granulation tissue. A skin graft will not grow on fatty subcutaneous tissue or on tendons. Muscle tissue is usually a good recipient for skin grafting. Smaller areas of exposed bone may take a skin graft if the periosteum is intact. The periosteum is the outer layer of bone and has good blood circulation.
Which wounds may be good for trying a skin graft?
-
Chronic wounds which have good granulation tissue in the wound bed and have an area that correlates to a long-expected healing time ( several months). As a rule of thumb, a skin graft may be applicable if you do not expect the wound to heal within 12 weeks.
-
Acute wounds ( traumatic wounds) with significant skin loss.
-
Burns

Figure 1 A severe infection over the dorsum of the left foot in a diabetic patient left behind a large area without skin. The wound bed was debrided several times and treated with negative pressure wound therapy (NPWT) to promote granulation. Once satisfactory granulation was achieved, the area was covered with a split-thickness skin graft. copyright: Rahul Gorka; DOI: 10.5772/intechopen.101375
Which wounds are not ideal for skin grafting?
-
Wounds where we expect the natural healing process to be short. In other words, wounds where we do not expect a skin graft to lead to significantly faster healing than natural healing.
-
Over bone that does not have intact periosteum
-
Over bones and ligaments
-
Wounds with poor arterial circulation
-
Infected wounds or wounds colonized with enterococcal strains or Pseudomonas aeroginosa
-
Wounds that are not debrided well
-
Wounds in areas with a lot of movement ( relative contraindication)
-
Wounds with hypergranulation
-
Radiation wounds ( relative contraindication)
How does the skin graft manage to grow into the wound bed?
It is fascinating that it is possible to move skin from one area of the body to another and get it to attach to the recipient site. It involves quite a complicated physiological process. Once the graft has been placed onto the recipient wound, it has no blood supply initially. The blood vessels on the underside of the graft that have been severed during the harvest suck up serum from the wound bed. This stage is called imbibition. After about 48 hours, the tiniest blood vessels on each side begin to meet; a stage called inoculation ( which literally means "kissing"). After about 6-7 days, new blood vessels have grown into the graft.
Does the wound bed need to be prepared in any particular way before placing the graft?
When we place a skin graft onto a wound, the wound bed must be as clean as possible and show healthy granulation tissue. Be aware that a graft will usually not take if there is significant hypergranulation. If you have signs of hypergranulation, you will first have to deal with this. Usually, a 10- day course of topically applied class III or IV steroid ointments will turn hyper granulation into normal granulation tissue.
Obviously, a skin graft cannot be placed on a wound bed with necrotic or sloughy tissue, which will have to be debrided first. Usually, a wound bed is not ready for a skin graft after such a debridement. Never hurry about the decision to make a skin graft. If you are unsure whether the wound bed is ready, it most likely is not ready for a skin graft!
Bacterial colonization is a challenge to skin grafting. If the wound is smelly, do not put a graft on it. If you suspect a bacterial burden in the wound, deal with the bacteria first. Particularly enterococci, streptococci, and Pseudomonas will lead to graft failure if they are present in the wound in significant numbers. Unless the wound bed has exceptionally fresh and clean granulation tissue, it is often a good idea to take a bacterial swab of the wound a few days before planning the skin graft procedure. If any of the above strains of bacteria are present, you must postpone the skin graft and try eradicating the bacteria with topical antimicrobial products. We find 10% povidone-iodine to be very useful here. Apply povidone-iodine-soaked gauze to the wound daily for about a week ( 10 days if there is Pseudomonas present), and in most cases, bacterial colonization will have cleared up. Also, we routinely place iodine-soaked gauze on the wound bed for a few hours just before the procedure to make the wound bed as clean as possible.
Negative pressure wound therapy (NPWT) is an excellent modality to prepare the wound bed and achieve excellent granulation. No other treatment modality can activate the granulation process as strongly as NPWT. Commonly about one week of NPWT is used to prepare the wound bed. Sometimes the wound may need to be treated with NPWT for 2-3 weeks before we see adequate granulation tissue. We have written a separate chapter on NPWT- please refer to this for more information on NPWT.

Figure 2 This patient is a 42-year-old man with diabetes and peripheral sensory neuropathy. On a mountain hike he developed a full thickness skin necrosis over the first metatarsal head due to inadequate footwear. If we had left this to heal naturally this would have taken many months. Instead, we applied NPWT for 10 days which lead to rapid granulation. After this we did a small split-thickness skin transplant which took well and after about 30 days the wound had healed completly. This is an excellent example of how NPWT in conjunction with skin grafting can give quick results. In elderly patients, however, the response to NPWT may be slower, significantly if there is impaired arterial blood circulation.
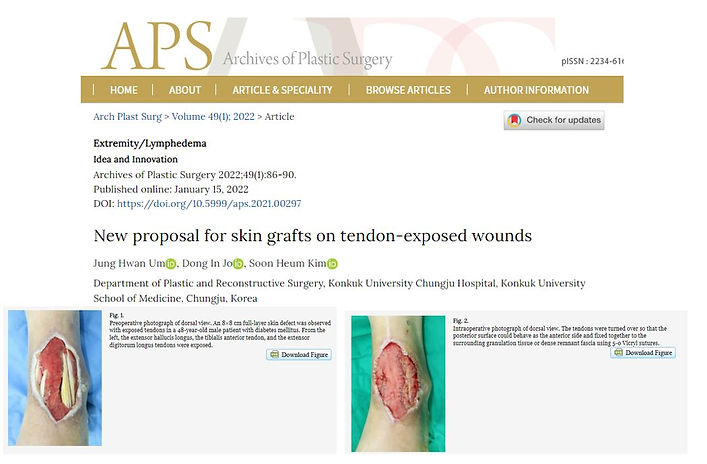
Figure 3 When there is an exposed tendon in the wound bed, this is a significant challenge as we cannot place a skin graft onto large areas of exposed tendon. In some anatomical areas, some tendons can be sacrificed and cut away. In other areas, it will lead to significant functional disability if we sacrifice certain tendons. Click on the image above to get to an article by Jung et al. where they propose an interesting tendon-sparing technique to prepare the wound bed for later skin grafting. Copyright: Jung Hvan Um et al.; Archives of Plastic Surgery, Volume 49(1) 2022
The recipient site must have a low bacterial burden for a skin graft to integrate into the wound bed. Chronic wounds will always have some bacteria living in them, but they should be kept in low numbers. As a rule of thumb, there should be less than < 100.000 bacteria per cm2 before attempting a skin graft. This threshold is only of academic relevance because, in clinical settings, we usually have no way to measure bacterial concentrations in a wound.
If the wound is smelly, it is not suitable for skin transplantation. Especially pseudomonas, streptococci, and enterococci are notorious for ruining a skin graft. Especially when doing larger skin grafts, we strongly advise you to do a bacterial swab of the wounded a few days before the skin graft to check especially for the bacteria mentioned here. This can save you from much trouble.
In many cases, it is sufficient to use topical antibacterial products like povidone iodine, silver, or dressings containing surfactants about a week before the skin transplant. Never use products with disinfection strength, alcohol, or chlorhexidine in the wound bed.
Even if the wound bed is nice and clean looking, we routinely do a careful debridement of the wound bed surface- scraping gently over it with a curette or a scalpel until we get some slight bleeding. The theory is that this opens some of the tiny blood vessels and enables them to connect to the skin graft more easily. We do this right before harvesting the skin graft from the donor site. While doing the harvest, we can place gauze soaked in a topical antibacterial product on the wound bed for about 15-20 minutes.
Is a skin transplant a sterile procedure?
Yes. Here you need sterile instruments, a facemask, a sterile gown, and sterile gloves. The skin on the donor site is prepped with a regular skin disinfectant.
Should you do a split-thickness or full-thickness skin graft?

Figure 4 The red line shows the depth for split-thickness and full-thickness skin grafts. Note that a full-thickness graft involves harvesting the skin deeper than the hair follicles. The tissue deeper than the hair follicles cannot produce new skin cells. This means that we either have to do a primary closure of the donor site or let it heal by secondary intention.
A full-thickness skin graft contains all layers of the skin. This results in thicker skin in the recipient area, but there are increased risks of failure as a full-thickness graft needs a better oxygen supply. Full-thickness grafts are often used on fingers and hands where we need skin that is more resistant to mechanical forces when the hand is used. Full-thickness grafts are also used in the face area to give better cosmetic results. Split-thickness skin grafts are much thinner and result in skin that is not very resistant to mechanical forces.
Moreover, split-thickness skin grafts often result in unpredictable pigmentation, which may lead to inferior cosmetic results. However, because split-thickness skin grafts are much thinner, they require less oxygen supply at the start, and the success rate is, therefore, higher in terms of the take of the graft. For treating chronic wounds, we use a split-thickness skin graft in most cases.

Table 1 Comparing split-thickness skin grafts (STSG) and full-thickness skin grafts (FTSG)- disadvantages and advantages of each method.

Figure 5 Split-thickness skin grafts can often be quite unpredictable concerning the final appearance of the healed site. In this image, we see areas with hypertrophic scarring, particularly around the edges of the graft. Copyright Casa Nayafana, Shutterstock.
Why is it important to make multiple small holes in a skin graft?
The skin graft is dependent on tiny blood vessels growing quickly from the wound bed into the graft. If wound exudate collects beneath the graft, this may interfere with this process, and blood vessels will not connect. It is, therefore, important to make multiple small holes/slits in the graft so that exudate can drain outwards through these holes/slits. This is important for both split-thickness and full-thickness grafts. A small scalpel ( No.15 blade is very good for this) is ideal for smaller grafts. Often split-thickness grafts are meshed in a special mesher which automatically makes the openings in the graft. Meshing the graft not only serves drainage of exudate through the mesh, but also increases the surface area of the graft. Full-thickness skin grafts are usually not meshed - here, it is sufficient to make multiple small incisions.

Figure 6 A specialized mesh apparatus makes the meshing process much faster and easier than manually meshing with a scalpel. copyright: Dr. Rafael Compto

Figure 7 There are a wide variety of meshers available. For many models, you will need a special plastic carrier plate that is single-use. These plates have a special pattern that determines the mesh ratio. We commonly mesh 1:1,5 when doing skin transplants on chronic wounds. Using a 1:1,5 ratio means that the graft will be approximately 50% larger in surface area after meshing than the original size. When doing skin transplants on large surface areas like burn wounds, for example, we often have to use a 1:3 mesh plate to avoid having to harvest a lot of skin. A 1: 3 mesh ratio gives a large surface area but is also a very thin graft which is not suitable for all purposes.
What are good donor sites?
A skin graft can be harvested from anywhere on the body, but some areas are better suited than others. Ideally, we should use an area that is not too visible and not exposed to a lot of mechanical forces. Common sites for harvesting STSGs are the thigh and buttock areas. The inside areas of the forearms are good sites to harvest FTSGs. When transplanting skin onto the face, it is important to harvest skin from an area with similar thickness and pigmentation to the rest of the face.
It is prevalent to see pigmentation abnormalities in both the donor and recipient sites, and informing the patient about this is important. Some patients can get quite normal pigmentation, while others may have cosmetically unpleasing pigmentation. It is usually impossible to foresee the results in different patients unless they already have had a skin transplant earlier and can show previous scars.
In dark-skinned people, the donor site usually becomes lighter in color (hypopigmented). In fair-skinned people, the donor site usually becomes darker in color (hyperpigmented)

Figure 8 Examples of donor site appearance some months after split-thickness skin grafting. In dark-skinned people, the donor site will appear lighter in color; in fair-skinned people, the donor site is usually hyperpigmented and may even appear purplish. copyright: Casa Nayafana, Shutterstock
Do you have some split-thickness skin graft left over? Replace it on the donor site!
Quite often you will have some STSG left over - even if they are only small pieces they should rather be returned to the donor site than discarded. Very often you have many small trimmings from the edges of the graft where there was some excess when placed on to the recipient site. You can cut these small pieces into even smaller pieces and place them back on the donor site like a mosaic. This is a little time consuming, especially since you should try to place them so that the epidermis layer faces upwards. These tiny pieces of skin act like seedlings and can considerably shorten the donor site's healing time. It also appears that there are fewer pigmentation issues when we place some skin back on the donor site. This technique is well illustrated in the article by Chalwade et al. 2022. Click on the image below to get to the original article.
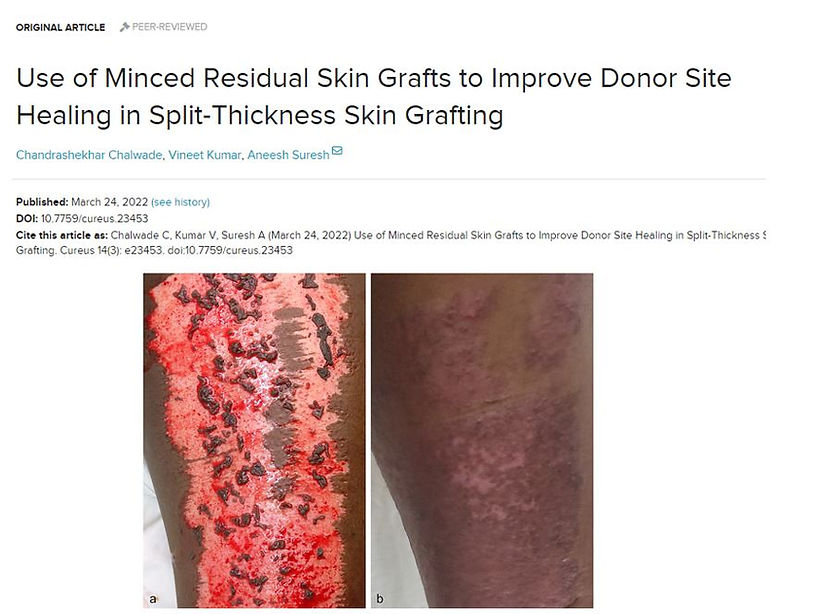
Figure 9 If you have small pieces of split-thickness skin grafts left over, they can be placed back onto the donor site to speed up healing and possibly improve the cosmetic appearance. In a recent article by Chalwade et al. 2022, the technique is well described with several illustrated cases. Click on the image above to get to the original article. copyright: cureus.com
What is the best dressing for treating the donor site after STSGs?
There is a lot of discussion and fuss going on about dressing choices for donor sites. The term donor site morbidity describes the complications that occur at the donor site after harvesting. The most common complication is slow healing or failure to heal at all. Sometimes the donor site gets stuck in the granulation phase for no apparent reason.
If you check the internet for this you will find a lot of different recommendations for how to treat the donor site. Some place a semi-permeable plastic film onto the donor site which is not changed for 10 days even if there is some exudate collecting beneath this. others advocate the use of polyurethane foam, alginate, or hydro fiber dressings. All authors claim that their method is the best.
We have tried almost all methods over the course of many years. The following method has survived the test of time in our hands and we have had excellent results with this. It is very rare now that we see patients with delayed healing of the donor site:
-
Immediately after harvesting the STST place dry cotton gauze on the bleeding surface of the donor site. Leave the gauze in place while you work with attaching the graft to the recipient site. Once you have finished with this most of the bleeding at the donor site has ceased. Remove the gauze carefully as not to aggravate new bleeding. We know that some people routinely use gauze soaked in lidocaine with adrenaline to stop the bleeding more efficiently, but we feel that we manage fine withput this. Some even use adrenaline alone for this purpose - again, we really don't see a need to do this and we are unsure whether adrenaline really is beneficial to the donor site.
-
When you have removed the gauze you initially placed on the donor site, apply some type of polyurethane foam dressing. Ideally, this should be a modern dressing with a silicone inner layer to prevent the foam from adhering to the donor site during dressing changes. Leave this foam dressing in place for 3-4 days. By the end of this time the exudative fase of the donor site is usually over and we can go to step 3.
-
After 3-4 days with a polyurtehane foam dressing, we use a hydrofiber dressing with silver ( Aquacel Ag). The trick here is not to change the Aquacel Ag for at least 14 days. Do not be tempted to take a look underneath the dressing before the 14 days have passed; otherwise, you will delay the healing process. In many cases the donor site has already healed when the 14 days have passed.
The technique mentioned here is used by many others with equally good results. Incidentally, this is similar to the way we treat burns as well. The reason for not applying Aquacel Ag directly to the donor site after harvesting the skin is that this only will result in a bloody hydrofiber dressing which will have to be changed already within a day or two. Therefore we recommend using a polyurtehane foam dressing until the bleeding fase is over.
Aquacel Ag is obviously not available to many caregivers in Africa and we are aware that many still use dry gauze to cover donor sites. The obvious disadvantage of regular gauze is that it will adhere strongly to the donor site bed and at each dressing removal this will tear away some of the epithelialization! Even more concerning is that this is very painful for the patient.
If you only have gauze available apply a liberal amount of unperfumed vaseline to the donor site before laying gauze over. The gauze will still adhere somewhat but certainly less. In our experience vaseline actually works very well on donor sites.
Others regularly use gauze soaked in povidone iodine to cover donor sites. Be aware that the iodine often dries out quite quickly and the gauze will then adhere to the donor site. Again- cover the donor site with a layer of vaseline beforehand to avoid these problems. In low-resource settings where silver-hydrofiber dressings are unavailable, we suggest using vaseline gauze as a contact layer, followed by fluffy gauze moistened with 5% povidone-iodine.
There are many articles online documenting the use of clear adhesive drape dressings on donor sites. We have tried this method and it does work fairly well. Usually some exudate will collect beneath the drape. As long as it does not leak out under the drape it can be ignored and dressings are changed about every 7-10 days. However, in our hands, nothing has worked as efficient and consistent as silver- hydrofibre dressings!
What can you do if the donor site shows delayed healing?
Sometimes the donor site will heal slowly if the STSG is harvested too deep. We routinely use 1/3 millimeter thickness when transplanting onto chronic wounds and burns, and at this depth, the donor site usually heals well. If you harvest deeper, you may get a donor site that heals very slowly. Note that even if you adjusted the dermatome to 1/3 millimeters in depth, using too much pressure on the dermatome can result in harvesting at a deeper depth. Using manual methods like a Humby knife you will need some experience to harvest at the optimal depth. However, even when harvesting at the correct depth, some donor sites show slow healing for no apparent reason. We have seen some cases where it took > 24 months for donor sites to heal completely and in a few cases donor sites never healed completely. In other cases, the donor site healed but was very sensitive and opened up superficially
In the last five years where we have exclusively used the Aquacel Ag method to treat donor sites we have had very few cases with delayed healing.
Typically if the donor site does not close within some weeks, hypergranulation often appears. This may not be the intense hypergranulation that we sometimes see in other wounds but more discreet so that it is not always recognized as such. Look for tell-tale signs like an intensily red color of the granulation tissue. The best treatment for this is applying Class III or IV corticosteroid ( for example Betnovate or Dermovate) ointments directly to the granulation tissue daily for 10-14 days. In most cases the corticosteroid quickly takes the granulation tissue out of the inflammatory fase and initates epithelialization. The epithelialization process seems to like corticosteroids so do not be hesitant to use these! However, sucess is only warranted if the steroid ointment is applied at least once daily ( even better with twice daily). While a treatment course of 14 days is sufficient in most cases, we sometimes extend the treatment for a maximum of 4 weeks.
If the hypergranulation does not respond at all after about 10 days of treatment something is wrong. Be aware that hypergranualtion sometimes occurs when there is critical colonization with certain strains of bacteria. Particularly pseudomonas and streptococci, but also enterococci and e-coli can cause the wound bed to react with hypergranulation. If you have hypergranulation that is not responding to steroid treatment you shoudl take a bacterial culture to check for these bacterial strains in particular. If one of these strains is present we suggest using topical antibacterials like povidone-iodine gauze or silver-based dressings for some weeks before trying the corticosteroid treatment again.
Many patients with chronic wounds are elderly. Can you take an STSG from a patient with paper-thin skin ("cortisone skin")?
We have good experiences with STSG in patients with very thin skin. This also applies to the donor site which usually heals well in this patient group, especially when using the Aquacel Ag method.
How should the graft be secured?
It is essential that the graft is secured well so that blood vessels from the wound bed can grow into the graft. It is also important that the graft is not stretched too much - this will cause the graft to float above the wound bed and lead to graft failure. The best method is to secure the graft using sutures or metal staples. Suturing is very time-consuming if you do transplants with a more extensive surface area. We usually use metal staples if this is available. Note that we also use staples or sutures in the center parts of the graft to ensure that the graft is well attached to the wound bed there aswell.

Figure 10 While sutures are the cheaper method of securing a graft to the wound bed, metal staples will save you much time if this is available. It is common not only to place the staples around the edge of the graft but to distribute some staples in the main part of the graft for proper fixation. copyright: Yoshiaki Sakamoto and Kazuo Kishi; intechopen.com 2013, Creative Commons Attribution 3.0 License
It is also possible to secure a graft using medical adhesive ( acrylate adhesives) or steristrips but in our hands this has not proven to be a very reliable method. Both adhesives and steristrips sometimes loosen prematurely resulting in a graft that may move.
When we are using the mosaic technique where we place multiple tiny pieces of skin on a woundbed we cannot glue or suture these in place. In this case we have to secure the dressing over the mosaic graft in such a way so that the pieces of skin can move as little as possible. The dressing should be held in place by tape or a bandage. Ideally, a silcone-coated netting should be used as a contact layer on the inside- so that the pieces of skin are not ripped off the wound bed at the next dressing change. It is advisable to make the dressing such that it provides some slight compression, pressing the pieces of skin into the wound bed.
Another method to retain and press the graft into the wound bed is the "tie-over" eller "boutonniere" method. A cotton swab or a folded compress is placed over the graft and retained in place by sutures which are knotted over the piece of cotton. The cotton material is the only dressing. It is advisable to apply some vaseline on the inside of the cotton to prevent this from adhering too much to the graft. This method is still commonly used for skin transplants in the face area where it is impractical for the patient to go with a big dressing or bandage.

Figure 11 The Tie-over or Boutonniere method is useful for securing a skin graft on the lower leg. The sutures used to secure the graft are kept long and then knotted over a piece of cotton with slight pressure to press the graft into the wound bed. The dressing should not be disturbed for 5-7 days. In this example, gauze, slightly moistened with 5% povidone-iodine, is used to provide an antibacterial dressing. copyright: Cem Inan Bektas/
Copyright © 2013 The Korean Society of Plastic and Reconstructive Surgeons
(open-access, http://creativecommons.org/licenses/by-nc/3.0/):
NPWT (negative-pressure wound therapy) is an excellent method to use as a dressing over a fresh skin transplant. NPWT removes unwanted wound exudate, increases the local blood circulation, and presses the graft into the wound bed. We generally see an improved take rate when we use NPWT over a skin graft. For many years we have therefore used NPWT routinely over all skin grafts at our clinic. Lately, we have changed this approach and only use NPWT in select cases. We realized that we were going in a direction where we thought that all skin grafts needed NPWT. We had almost forgotten that we managed fine before using NPWT on a skin graft. However, we commonly use NPWT to prepare the wound bed before applying a skin graft. When we use NPWT on a skin graft, it is usually in situations where we are not 100% sure that the wound bed will happily accept a graft.
When using NPWT over a skin graft, we never use black foam or other foam material. In our experience, these foams can dry out a graft and lead to granulation tissue growing through the mesh over the graft. Also, when the foam contracts during activation of the vacuum, it can draw on the graft edges and loosen it from the wound bed. We, therefore, recommend using either white foam ( this is premoistened and does not contract as much as other foams) or gauze as a wound filler over the graft. If available, we advise using a special type of gauze called Kerlix AMD. This is an antibacterial gauze that should be slightly moistened with saline ( squeeze out all moisture with your hands before application. it should be slightly moist, not wet). Most likely, this type of special gauze is not available to you. In this case, you can use regular cotton gauze. To prevent the gauze from adhering to the skin graft, a contact layer mesh can be placed between the graft and the gauze. When using white foam, a contact layer is not necessary. However, at dressing change, you have to be very careful - any dressing will adhere slightly to the graft, and you have to avoid pulling on the graft vertically at any cost- this will tear the tiny blood vessels that have grown into the graft.
In our experience, NPWT should not be used over a skin graft for more than five days at most. If you use NPWT longer, granulation tissue may grow through the mesh openings and establish itself on the skin graft, which will ruin the graft. Also, there seems to be no apparent improvement in the graft take if NPWT is used for more extended periods.
It is generally recommended to use compression bandages over skin transplants. For one, the compression bandage will press the graft slightly into the wound bed and help secure it. Secondly, compression will reduce edema and the amount of exudate from the wound bed. Much exudate will usually ruin a graft. When exudate weeps from the wound bed, the blood vessel ingrowth into the graft is inhibited. This is especially true for grafts on legs and feet.
How much can the patient move after a skin transplant?
In "the olden days," patients were often restricted to bed rest for the first week following a skin transplant. Today we are not as strict about this; some patients are treated with skin grafts as out-patients. Most patients can be mobilized if the graft is secured with staples/sutures and covered with a good dressing and compression bandage. Still, the patient should not be encouraged to do much activity - they may move around their home but should otherwise rest as much as possible. If the graft is on the lower extremity, elevation of the limb is recommended to prevent edema. If NPWT is used over the skin transplant. The patient can be more mobilized as NPWT secures the fixation of the graft well.
If you are working in a low-resource setting, you may not have access to compression dressings, and in this case, you may have to be more restrictive and keep the patient in bed for the first 5-7 days until the graft has started to attach to the wound bed.
When placing a skin graft over areas with a lot of movement, like over the knee or elbow, it is necessary with strict restrictions. In these cases, it is highly recommended to immobilize the area with a cast for up to 2-3 weeks until the graft has adequately attached. The graft needs to be inspected at least once weekly- the cast will have to be changed several times.
When should the graft be inspected for the first time?
A skin graft should not be disturbed unnecessarily- it needs "peace" to attach to the wound bed. Think of it as a seedling that has just begun to sprout; it would probably not survive if you pulled it out and pressed it back into place. It is the same with the skin graft. Every time we change the dressing, we risk pulling on the skin graft, which can lead to graft failure. As a rule of thumb, we avoid taking a look before 4-5 days have passed. When you change the dressing, do this very carefully if you have used a contact layer between the outer dressing and the graft.
As with most rules, there are exceptions. Sometimes we have placed a graft on a suboptimal wound bed to accept a graft. Examples are wounds with a little more secretion or a slight smell. You may ask whether a graft should have been placed on such a wound in the first place. And you are right - if you are unsure whether the wound bed is ready to accept a skin graft, it is probably not! However, if you have placed a skin graft on a wound you are unsure about for whatever reason, it may be wise to take an early look at the graft. A wet dressing due to much exudate can kill your graft. The same will happen if you have a high bacterial burden in the dressing covering the graft. In these situations, we usually follow the graft closely and may already take a look a day or two after the procedure. In rare cases, we change the dressing daily to be on the safe side. When doing so, we do this extremely carefully, avoiding any tension on the graft! If available, use a non-adhesive contact layer ( usually silicone mesh) between the dressing and the graft to prevent the dressing from adhering to the graft. Again, taking an early look at the graft is only necessary in rare cases. In most situations, we try to avoid this and do not look at the graft until day 4 or 5!
What should we do if the graft does not appear to be doing too well at the first inspection?
At the first inspection after 4-5 days, the skin graft should ideally be pinkish in color. Sometimes it may look slightly greyish.

Figure 12 Left image: a split-thickness skin graft over the first metatarsal area in a diabetic patient on day 5. The graft looks vital and has a pinkish color. Right image: a split-thickness skin graft over a wound bed following the amputation of the greater toe. The graft seems slightly greyish/purplish but healed nicely.
Provided that the wound bed had healthy granulation tissue, a graft should be able to heal well. If a graft has failed, this is usually due to too much moisture ( too much exudate) coming from the wound or if there is a high bacterial burden. Especially pseudomonas, streptococci, and enterococci can quickly ruin a skin graft. Too much moisture will "drown" the skin graft, too many bacteria will eat away at the skin graft.
If you see a whitish graft at the first inspection, this is not a good sign. Something has gone wrong.

Figure 13 Two examples of split-thickness skin grafts that did not look vital at the first inspection after 4-5 days. They are whitish in color, and the grafts have not attached properly to the wound bed. It is not easy to say what has gone wrong here. In neither case did we suspect a particularly high bacterial burden, and only moderate amounts of exudate were coming from both wounds. Unless there are signs of infection- leave the graft in place. Secure the grafts as well as possible with the dressing and use a compression bandage where applicable. Although the entire graft will not take perfectly in both these cases, some areas of the graft may take after all. Keep a failed graft in place as long as possible and see what happens. Sometimes a failed graft will turn into a dry scab which is also beneficial to healing.

Figure 14 A partial thickness skin graft that has healed nicely over most of the area (anterior leg), but there is dry necrosis at the edge outlined in red. If this dead tissue remains dry, you can apply a wait-and-see approach. Sometimes the dead tissue acts like a regular scab, and new skin can form beneath this. If the necrotic part of the graft turns into wet necrotic tissue, it should be carefully debrided. Copyright: Nsaful et al. Modern Plastic Surgery, Vol.10 No.3, July 2020. Creative Commons Attribution 4.0 International License.
If the skin graft looks pale or whitish, all hope must not be lost! Do not remove the apparently non-vital graft. Some skin cells usually will have survived, and the situation can sometimes be salvaged with the right dressing. In our experience, the best method is to dry out the " failed" graft. Turn it into a dry scab. When we scrape ourselves, our body makes this grow by means of a scab - we can use the same method with a "failed" graft. If available, we advise using dry Kerlex gauze directly on the graft. Kerlex is a cotton gauze impregnated with antibacterial substances, but you can also use regular cotton gauze. Change the dressing daily at the start, especially if there is some exudate. When using this technique, we usually do not have a contact layer between the gauze and the graft because the contact layer often prevents the drying-out process. Therefore, when changing the gauze dressings, you must do so very carefully to prevent ripping off the remaining skin graft. Moisten the gauze with some saline a few minutes before dressing change every day.
If the graft fails completely, it will turn into a greyish slime over time. At this point, only very few skin cells, if any, survived. But as long as you see some pattern of the meshed graft remaining, there is hope that the "failed" graft may stimulate some epithelialization nonetheless. Remain patient and see what happens over the course of a few weeks.
You will sometimes see the graft turning into black necrosis when using full-thickness grafts. While this is also a form of graft failure, you may treat the black necrosis as a scab as long as there is no sign of infection. Quite often, epithelialization will occur under the black scab. We often use full-thickness grafts on fingers - in at least 30% of the cases, the graft will heal as a necrotic scab, as shown in Figure 11. If the black scab has not detached by week 6, we usually start to scrape at it carefully; often, we see new skin that has formed beneath this.

Figure 15 A full-thickness skin graft over the mid joint of a finger. The graft has become necrotic and appears as a black scab. While this is a graft failure, you can keep the necrotic scab in place. Usually, skin will form beneath this in the course of some weeks. Use dry dressings over this to keep the scab dry. Copyright: Dr. Rafael Compto
The most common methods for harvesting skin grafts
The blister method
This is a very simple method for harvesting smaller amounts of very thin split-thickness skin grafts. Most of us have experienced a blister on the heel after wearing new shoes. The part of the skin forming the blister's roof can be used as a skin graft! It would be impractical to ask the patient to use tight shoes so that he develops a friction blister which we can use as a graft. Instead, we can easily and rapidly make blisters using suction. The cheapest method to do this is by using syringes and a three-way adapter. Remove the piston from the syringe, place it on the skin and create a negative pressure environment by removing air via the three-way adapter and another syringe connected to this. In about 30-40 minutes, a suction blister will have developed, and the roof of the blister can be harvested. This method is usually quite pain-free for the patient, and because the graft is so thin, it usually does not cause scarring at the donor site! The donor site heals rapidly in most cases.
There is a commercial solution for making blister grafts. KCI/Acelity/3M sell a machine called the Cellutome. The apparatus is applied to the skin, an automatic pump provides suction, and a heating unit warms the skin slightly to enhance the development of blisters.

Figure 16 Using syringes to make blister grafts. 20 ml syringes are ideal for this. Depending on the area of graft needed, you may have to use several syringes. Using another syringe connected to a three-way valve sucks out the air while ensuring that the syringe is sitting well on the skin - it has to be an air-tight seal. Once negative pressure has been established in the syringe, it will normally stay in place on its own and does not need to be fixated. After about 30-40 minutes, a blister is usually developed and can be harvested with scissors or a scalpel. The technique is relatively pain-free, and usually, local anesthesia is not required. Copyright: Dr. Rafael Compto

Figure 17 Using the Cellutome to harvest many tiny blister grafts simultaneously. A single-use plate is attached to the donor site using velcro adhesive bands. A suction pump is connected to this plate, which is also slightly heated to encourage the formation of blisters. In about 30-45 minutes, small blisters will have developed that can be transferred to the recipient site using a contact layer like silicone netting, for example.
Video 1 A short training video about the principles of using the Cellutome. At the end of the video, you will see a good example of how well the donor site heals with this procedure. Copyright: KCI/Acelity/3M
The blister graft method is suitable for smaller wounds that are well-granulated and have a minimal bacterial load. A blister graft is much thinner than a split-thickness skin graft, and it is more vulnerable to adverse factors. For example, blister grafts will usually not take well if there is an unfavorable bacterial imbalance in the recipient wound bed. Remember that a blister graft is not the same thing as a split-thickness skin graft. A blister graft only contains the very outer layer of the skin, that is, the part of the skin where we have a large number of dead skin cells and only a few fibroblasts (it is the fibroblasts that cause epithelialization). A split-thickness skin graft, in comparison, contains very many fibroblasts.
Harvesting a blister graft is a very gentle method and leaves no scarring. This means that the process can be repeated several times in the course of several weeks. In most cases, you will have to repeat the treatment 2-3 times before seeing any significant epithelialization. If you are using the simple and cheap syringe method, then this will not be a cost factor. If you are using the Cellutome, doing repeated treatments will, of course, be quite costly. However, even when using the commercial solution with the Cellutome, it is absolutely a cost-effective method. If we can shorten the healing time by a month or two, then the costs saved from dressing changes will justify the use of the product. This is undoubtedly true for western countries, where a single visit by two home care nurses equals the cost of one Cellutome treatment.
Harvesting skin using a shaving blade or a scalpel
This is a simple method for harvesting smaller amounts of split-thickness skin grafts. It can also be used to harvest many small pieces of skin for a mosaic plasty graft for larger recipient sites. The grafts harvested in this way are deeper than blister grafts and therefore contain more keratinocytes. It requires some training to harvest grafts with the appropriate thickness. We prefer the shaving blade method to using a scalpel. Hold the shaving blade as shown in figure 14. and bend it slightly as you push it forward. You have to numb the donor site with a local anesthetic before harvesting.

Figure 18 A razor blade is a good tool for harvesting smaller amounts of split-thickness skin grafts. Bend the blade slightly as you push it forward, making sure not to go too deep. The donor site will obviously have to be anesthetized with lidocaine beforehand. copyright Sri Mulyani Indrawati
Manual dermatome
A dermatome is a tool designed to harvest larger areas of skin grafts. Manual dermatomes work without electric power. They are loaded with a single-use blade. It requires some training to harvest grafts with the desired thickness, and the graft often ends up with tagged edges. A commonly used dermatome was the Watson & Humby dermatome, the second from the left in the image below. These dermatomes have an adjustment wheel that changes the depth of the harvest from 0,1-2.0 millimeters. However, this does require some training, and if you have the resources and do skin transplants regularly, a powered dermatome will provide more consistent results.
If you are looking for a good manual dermatome, we recommend the SOBER Dermatome by Humeca, as this is probably the most user-friendly manual dermatome and allows for consistent results also in less skilled hands.

Figure 19 A choice of manual skin harvesting dermatomes. The model on the left uses regular razor blades, making it a cost-effective dermatome for smaller harvests. Number two from the left is the classic Watson-Humby dermatome which is well-known to many surgeons worldwide. We have marked the Sober dermatome by Humeca with a red box because if you want to invest in a manual dermatome, then this is the one we recommend. It is easier to use than the other manual dermatomes on the market and provides consistent harvesting results.
Electric- or pressure-driven dermatomes
Previously many tools used in an operation theatre were driven by pressurized air as these were cheaper to manufacture than electrical tools. Some clinics still use these types of dermatomes. In recent years many clinics have gone over to using battery-driven dermatomes that can be recharged. Be aware that there are quite some differences in how precise these instruments harvest a graft and how user-friendly they are. We are impressed with Braun`s dermatome Acculan Ti® which delivers excellent results also in inexperienced hands if using too much pressure or holding the dermatome at a wrong angle. If your clinic wants to acquire a new battery-driven dermatome, we can recommend the Acculan Ti model.

Figure 20 A selection of battery-powered dermatomes. A)Padgett Dermatome B)Humeca Dermatome C)Zimmer Dermatome D)Braun Acculan Dermatome
Full-thickness skin grafts( FTSG)
In some anatomical regions, a partial-thickness skin graft may yield poor cosmetic results. For example, it is usually better to use a full-thickness graft concerning defects in the face area because it will usually lead to a better cosmetic result. We rarely use full-thickness skin grafts in chronic wounds because this type of graft is more challenging as it requires better wound bed conditions at the recipient site than an STSG. An FTSG is thicker, therefore, demanding a better oxygen supply through the wound bed surface. An STSG usually takes more readily, even in poorer conditions.
In smaller acute trauma wounds, like traumatic wounds on fingers, for example, FTSG usually performs very well. Fingers typically have excellent blood circulation. Often we can harvest an FTSG graft and cover the defect immediately. Often we harvest a keel-formed FTSG from the inside of the upper- or lower arm, where we usually have some excess skin; the skin here is generally hairless and of ideal thickness.

Figure 21 Example of harvesting a keel-formed full-thickness skin graft inside the lower arm. The defect at the donor site can be closed immediately with sutures. Both the upper and lower arm's insides are ideal for harvesting smaller FTSGs.

Figure 22 It is essential to remove all subcutaneous fat from the underside of the FTSG so that blood vessels from the wound bed can grow into the graft as quickly as possible. Copyright: Dr. Cynthia B Moore.

Figure 23 Covering a defect on a finger with a full-thickness skin graft. These small grafts are often harvested from the inside of the lower- or upper arm. Note the small incisions in the graft to allow exudate to pass through. If a seroma or exudate collects beneath the graft, it will lead to graft failure. Copyright: Dr. Cynthia B Moore
FTSG- the mosaic graft technique, pinch technique (Reverdin skin graft)
If you do not have the equipment to harvest and mesh STSG`s you can also make a mosaic of small FTSG`s. An easy way to harvest these grafts is by using a 3-4 millimeter biopsy punch. Removing the adherent subcutaneous tissue from these small pieces with a scissor is a cumbersome and time-consuming task if you are covering a large area with many small pieces of skin. If you pick up the punched-out skin with forceps while it is still in the donor site- you can cut it off with fine scissors just above the subcutaneous layer, thus avoiding this cumbersome task. Another method is to perform a boat-formed excision on the lower- or upper arm. It is easier and quicker to scrape away subcutaneous fat when you are working with a larger piece. You can then cut the piece of skin into smaller bits and place this onto the wound. The donor site is closed with regular sutures. Alternatively, you can harvest many superficial bits of skin- similar to split-thickness skin grafts- this is called the pinch method.
Incidentally, there is much confusion about the terminology here, depending on which source you are reading from. Some refer to this method as a pinch method, others as a punch method ( the latter we think is an incorrect term for this). To avoid any misunderstandings, you should call this the mosaic full-thickness skin graft technique or, accordingly, the mosaic partial thickness skin graft technique.
What is the rationale for using a mosaicplasty-type skin graft? For one, it allows us to initiate healing without harvesting much skin - i.e., the donor site morbidity is low. The survival of the graft is often better when there are small pieces; it seems they become more rapidly vascularized. It is a straightforward method that health professionals can use with little training. The downside is that the graft does not cover all of the wound- the remaining wound surface has to heal by subsequent epithelialization. Another disadvantage is that keeping the small pieces in place is not easy. With a larger graft, you can suture the graft in place, but it is impractical to put a suture into each of the small mosaic pieces; we don't think it would do any good. You must rely on the dressing to keep the mosaic pieces in place. If you use an adherent dressing, you can be confident that the pieces will tear off at the following dressing change. You should use a non-adherent contact layer if that is available. The really good contact layers for this purpose are made of silicone ( for example, Mepithel). They usually stay in place nicely, and at each dressing change, you can change the secondary dressing and leave the contact layer in place for about 7-10 days. We usually use very slightly moistened gauze as the secondary dressing and change this about every third day. The next crucial step is securing your dressing so it will not dislodge. Ideally, patients with mosaic skin grafts should not move much, especially for the first five days. We usually fixate the dressings with skin-friendly but strong adherent tape and secure this further with gauze or, even better, a compression bandage. In most cases, compression is useful in skin grafting as it may reduce the amount of exudate from the wound bed. A lot of exudate will lead to graft failure. The mosaic skin graft technique is an underutilized method of skin grafting, and we think it should be used more, especially in low-resource settings.
If a mosaic graft fails, it is usually due to the same factors that cause other skin grafts to fail. Most commonly, this is because the recipient site is not well enough prepared to accept a graft. There may be a too-high bacterial burden. Remember that especially Pseudomonas, streptococci, and intestinal bacteria will often cause graft failure. Another reason for graft failure is that the wound bed is not appropriately debrided - if there is some necrosis or layers of fibrine in the wound bed, a graft will not take here. The wound bed has to have fresh granulation tissue for the graft to survive.

Figure 24 Small bits of full-thickness ( or split-thickness) skin can be harvested using a scalpel or a biopsy punch and placed onto a wound bed. This method is called a mosaicplasty skin graft, pinch graft, or Reverdin skin graft. Copyright both images Dr. Cynthia B Moore
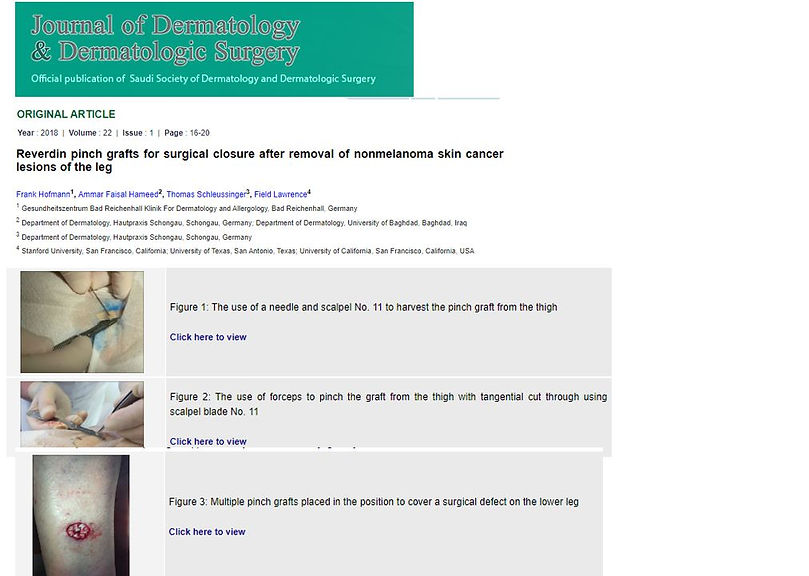
Figure 25 This article published in the Journal of Dermatology & Dermatologic Surgery gives a good overview of the mosaic skin graft/ Reverdin skin graft technique. Click on the image to get to the article. copyright: Journal of Dermatology & Dermatologic Surgery 2018.
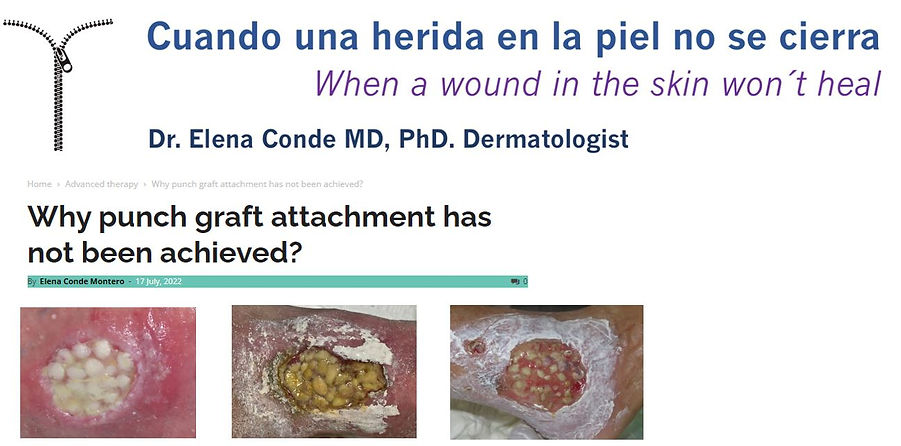
Figure 26 Dr. Elena Conde Montero is a dermatologist and has an excellent website explaining many different wound-care techniques from a very "hands-on" perspective. She has several articles concerning skin grafting. If you click on the image above, you will get to an article on her website discussing failures in these grafts. We also agree with her theory- even failed grafts sometimes lead to an improvement in the wound bed and can be utilized to improve the wound bed for another round of grafts later. copyright: Dr Elena Conde Montero; www.elenaconde.com
FTSG: the pinch-punch graft method
This method involves harvesting small pieces of skin with a biopsy punch- we find that a 3-4 millimeter biopsy punch works well for this. This is the "pinch" part of the method- you are "pinching" skin from a donor site. In the wound bed, you then make corresponding holes with the same size biopsy punch ( use different punches for the donor or recipient site for hygienic reasons). You then place the harvested bits into these holes - you press them into the holes ( or punch them into the pits- therefore: the "pinch-punch" technique). You press the skin bits into the punch holes like a maize seed into a small hole in the earth. You usually do not have to cut away any subcutaneous tissue for this technique. Sometimes it can be difficult to press the harvested bits into the punched holes, but this is usually not a challenge. It helps to have very finely-toothed forceps to transfer the skin bits and gently press them into the small holes. One advantage of this method is that it is easier to keep the tiny skin grafts in place once they have been "planted" into the holes. With the mosaicplasty method, you only need to anesthetize the donor site. With the pinch-punch method, you have to use local anesthesia at both sites. The mosaicplasty procedure can be done using only a scalpel; for the pinch punch method, you need a biopsy punch and preferably fine-toothed forceps.
There are several adaptations to this method. One involves making a pocket in the granulation tissue of the wound bed to slide the skin transplant into. We do not have any images for this of our own, nor did we find illustrative examples of this on the internet. However, an educational website for veterinarians (dvm360.com) has a good article on this technique, demonstrating it on an animal model.

Figure 27 An alternative method to the pinch-punch skin grafting technique is cutting small pockets into the recipient granulation tissue and sliding the skin graft pieces into the pockets. We did not find any illustrative images of this technique, but the educational website for veterinarians, dvm360.com, has good step-by-step instructions on an animal model to demonstrate this technique. Click on the image above to get to their webpage. copyright: www.dvm360.com
The use of cultured skin and biological skin products.
In the USA, biological skin substitutes have also been utilized in chronic wound care for over 30 years. The majority of the products on the market today have been developed there. In Europe, it is less common to use such products to treat chronic wounds, and they are more strictly regulated there. In low-resource areas, it is, of course, unrealistic to even think about these products because they are inhibitive expensive. We briefly discuss such products to give you a brief overview.
Cultured skin
Cultured skin is real epidermis that is cultured from the patient's own cells. It is, for example, possible to draw out a few of the patient's hairs ( from the head, for example) and send them to a laboratory where epithelial plates are cultured from the cells at the root of the hair. This process takes about two weeks, and the laboratory then sends the living epithelial cells back by speed courier. This is a costly procedure; in most cases, it would be easier and cheaper to do a mosaic split-thickness skin graft, as explained earlier. However, the advantage of using cultured epithelial cells is that we avoid (minor) scarring at the donor sites. If our patient was a bikini model ( they do not tend to get chronic leg ulcers), we might consider this method.

Figure 28 It is possible to culture epidermal cells from hair roots harvested from the patient. A small number of hairs are pulled out and sent to a laboratory in a special medium. In the laboratory, the cells are cultured for about 10-14 days and can then be used to cover a wound.
Biological skin substitutes
There is a confusing amount of "artificial" skin products on the market. We will not go into any detail here because these products will not be available to most health professionals in Africa (nor are they available to most health professionals in Europe).
The common denominator for most of these products is that they provide a matrix onto which the patient's epithelial cells can attach and gradually cover. Some contain fibroblasts and/or keratinocytes from human or animal donors. It is not possible to transplant skin from one person to another - the graft will always be rejected. There are, however, some tissues that can be transplanted, for example, the cornea of the eye or a meniscus of the knee. The same applies to keratinocyte cells. Some products contain fibroblasts extracted from the foreskin of circumcised boys - while it is a waste product, there are some ethical considerations, especially if you come from a country where ritual circumcision is not permitted. Since this practice is common in Africa, however, it would be less discerning to use such a product there.
If we were to highlight one product out of the confusing mass of products available today, it would be Apligraf®. This product was developed over 20 years ago and probably has the best documentation for use in chronic wounds out of all these products, especially for diabetic foot ulcers. In the USA, it is FDA approved for use in venous- and diabetic ulcers. It is very easy to use and can be stored at room temperature. Apligraf is manufactured using an established tissue engineering process and consists of a layer of keratinocytes and a layer of fibroblasts grown in bovine collagen. It costs about 1000 US Dollars per piece and often requires a repeated application. If used on the right patient under the right indications, the price can be justified if we can save a limb with the product.

Figure 29 The images above illustrate the use of Appligraf® as a skin substitute. The product is placed on the wound as you would with a skin graft, and repeated applications are often necessary to achieve complete healing. The product can also be meshed to cover larger areas. Copyright: Appligraf

